A video walkthrough of this process is available on YouTube: How I turn my visual art into DJ sets
The visual side of my DJ sets did not begin as a neat product idea or a tidy software workflow. It started as a personal attempt to represent what electronic music feels like in my head: partly a slowly evolving landscape, partly the abstract lights and shapes of synesthesia.
For a long time that process was difficult to explain because it depended on a stack of rough scripts, prototypes, and manual steps. Now that Vizloom exists, the workflow is finally reproducible by anyone, and so I thought I'd describe it end to end. In this post I'll discuss:
- how I sculpt 3D assets in VR;
- use them in Blender to animate procedural 3D worlds;
- then render them into independent visual layers;
- tie them to each song using Vizloom;
- and finally mix the result live using Serato DJ, MixEmergency, and TouchOSC.
One of the scenes made in Blender and used as source material for visualizing live performances.
Intent and Constraints
When I started making these visuals, the goal was not just to have pretty backgrounds for a DJ set. I wanted the work to almost look as if the music was a diegetic emanation of it. Different parts of a track seem to suggest different visual parallels in my head, and over time that pushed me toward a specific kind of imagery: landscapes, architectural loops, moving light, and shapes that behave like a form of synesthesia.
Rhythmic Sections and Breakdowns
One of the strongest contrasts I hear in music is the difference between rhythmic sections and breakdowns. In rhythmic sections, attention collapses onto the kick, bass interplay, claps, hats, and other repeating details. In breakdowns, the song often feels like it stops describing repeating patterns and starts describing a more open-ended space. It becomes wider, slower, more atmospheric, almost as if it is shining light on the environment around you.
That contrast is one reason I keep returning to landscapes and fly-throughs. A scene can feel vast and contemplative during a breakdown, then tighten back up around specific objects and pulses when the groove returns.
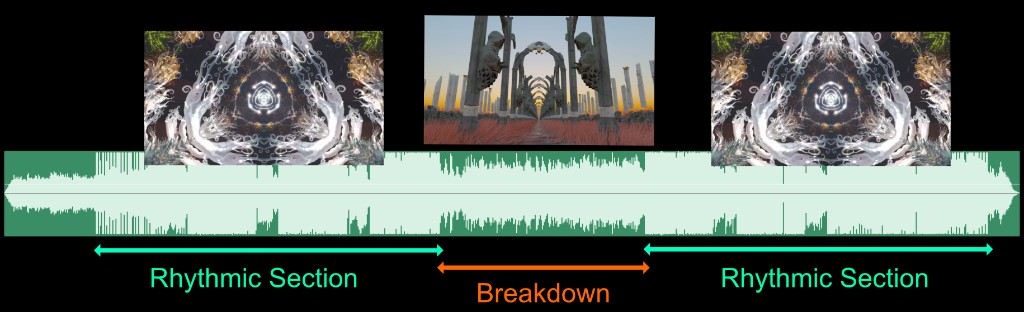
I tend to think of tracks as alternating between dense rhythmic passages and more spacious, scenic moments.
Synesthesia, Instrument Roles, and Mood
The next challenge is describing the intricacy of rhythmic patterns. Most tracks have recurring elements that matter every time: kick and bass, claps, snares, hi-hats, rolling basslines, and other repeated gestures. This is where the synesthetic part comes in. I am not following a strict system, but I do have instincts about which kinds of shapes and lights should stand in for which kinds of sounds.
Lower-frequency sounds often feel better represented by larger, softer, more colorful forms. Higher-frequency percussions tend to want something brighter, sharper, and smaller. Rolling basslines often feel like multiple related notes that should move together visually, not like isolated events. So each scene needs enough embedded visual elements that I can light them up in different combinations depending on the track.

Clusters of nearby lights can be assigned to related notes so they read as one visual idea rather than isolated flashes.
Mood and Realism
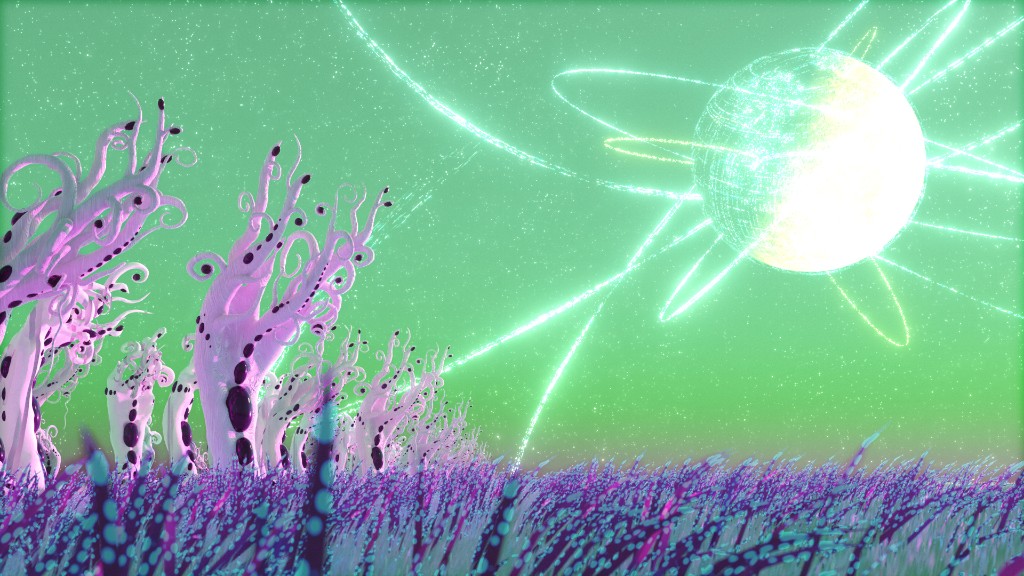
Mood matters just as much as rhythm. A lot of the music I like to play carries a sense of mystery, often with a science-fiction flavor. Many tracks also evoke awe for nature, and all of it seems tied together by a pull toward meditative observation. Those feelings became one of the main sources of inspiration for the visuals, shaping not just what I depicted but how I wanted it to feel. Since I had already decided to make 3D animation my main creative tool, I wanted the scenes to feel believable enough that the viewer could sink into them and follow the same emotional direction as the music. A videogame-like look would have felt too distracting and off-topic.
That is a big part of why I settled on Blender and offline rendering rather than chasing a faster real-time workflow at all costs. I was willing to spend minutes rendering a frame if it meant the final image would better support that sense of wonder, contemplation, and atmosphere. Unreal Engine was a close second on my list, and it did find its way into my experiments over the years. But once I realized that real-time rendering was not going to be central to my process, I chose Blender because it offered the widest variety of procedural animation and 3D modeling tools under one roof.
Why Loops Became the Core Constraint
The final big constraint comes from the format of the music itself. I was mostly going to be visualizing various branches of techno, which is repetitive, regular, and forward-moving. It feels like a journey through a place rather than a sequence of cuts. So the visuals also need to move forward continuously, without seams or abrupt scene changes.
That creates a three-way tension. I want the scenes to look realistic enough to preserve that sense of wonder. I want them to be seamless, because the music is seamless. And I want them to remain adaptable enough that the same visual world can be reused across many songs and many sounds.

The core balancing act: realism, seamless looping, and adaptability all compete with each other.
That tension is what sent me down the rabbit hole of figuring out how to make natural-looking scenes behave like convincing seamless loops. I could not afford to render every animation from scratch for every song, especially because I keep adding multiple tracks to my library every week. One way of adapting a scene to different songs is to render it into multiple separate layers that can be recombined later, but that is also expensive: each scene has to last long enough for a full track, and each one may need to be rendered even ten times for all its separate passes (scenes might have more than 20 layers)! Constraining each scene to be a shorter seamless loop became one of the main ways to keep that cost manageable. It also fits the genre itself, which is built so heavily from overlapping audio loops.
3D Animation
Blender
Most of the environment work happens in Blender, the free and open-source 3D creation suite. It really is a bit of a Swiss army knife for 3D work, and in this process I rely especially heavily on Geometry Nodes. I have been following Blender, its evolution over the years, as well as the regular release of its open movies. A few years ago, while traveling through Amsterdam, I even got to visit the Blender Foundation and meet some of the people behind it. Spending time around artists and engineers who care that much about keeping a world-class creative tool open and accessible only made me appreciate it more. If you end up using Blender yourself, it is well worth supporting with a donation.
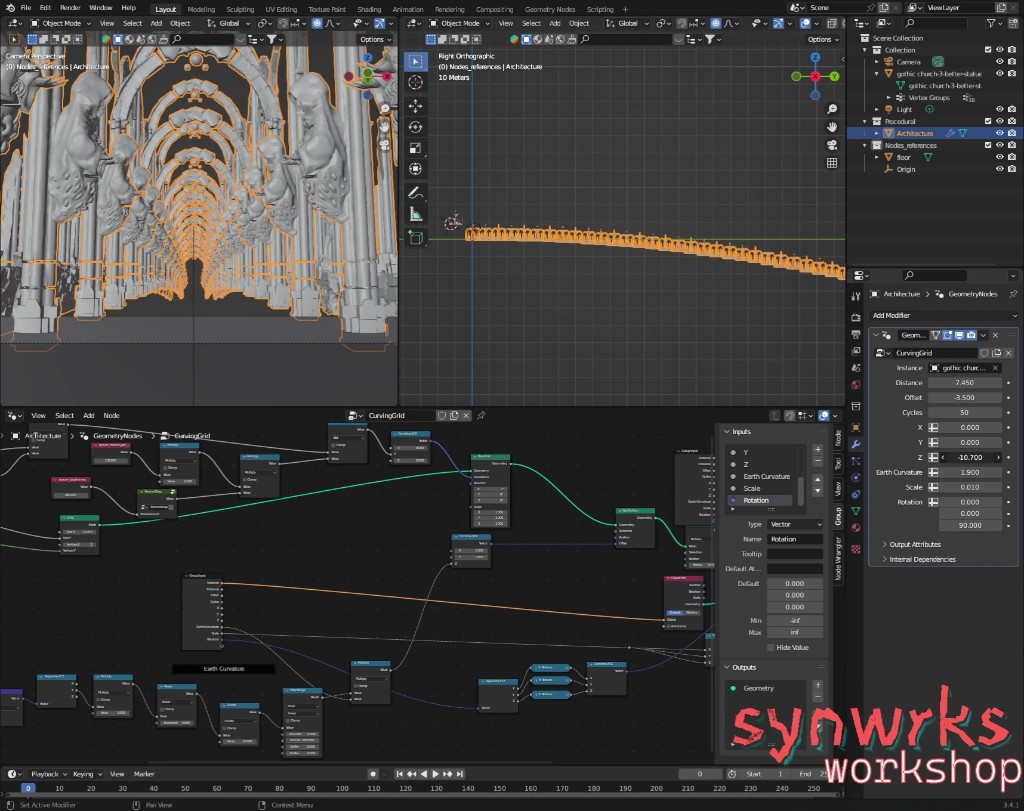
Geometry Nodes are central to building looping environments that still feel alive and not too obviously mechanical.
Geometry Nodes let me describe motion and structure mathematically instead of modeling every detail by hand. I use them for things like grass or branches swaying in the wind, where adding and multiplying sinusoids together can create a more natural, seamlessly looping ebb and flow. I also use them to shape how environments repeat, for example by curving the path ahead so it disappears under the horizon rather than extending in a visibly infinite straight line.
That helps reduce the feeling that you are looking at a simple repeating pattern. It also saves me from relying on cheaper-looking tricks to hide the loop, like introducing doors or other barriers. Another related habit is that I usually do not move the camera at all. The camera often stays fixed at the origin, at coordinate 0,0,0, while the world itself moves. That makes the animation logic much easier to reason about mathematically, which is especially handy when calculating things like the motion of flying particles.
Even the movement of particles can be described mathematically to ensure a seamless repetition.
Oculus Medium
Not everything in these visuals is procedural. Many of the specific assets are sculpted in Adobe Medium (originally created within Oculus), which is still one of my favorite tools for making 3D art. In a very real sense, it is one of the tools that lured me back into this field after a long break, because it made modeling feel much more fun and intuitive. It works with voxels instead of traditional polygon modeling, so it turned the process of clicking your way through edges and vertices on a screen into shaping clay in VR. It keeps me in the creative flow instead of getting bogged down in technical micromanagement, and brings a tactile experience back into the digital art workflow.
In this software I make many of the trees, statues, alien forms, spaceships, and other sculptural pieces that appear in the scenes. Once the sculpt is finished, I bring it into Blender, give it materials, light it properly, and integrate it into the larger looping world. In practice, that means almost everything you see is either described mathematically through nodes or sculpted in VR. The final image is a hybrid of both approaches.
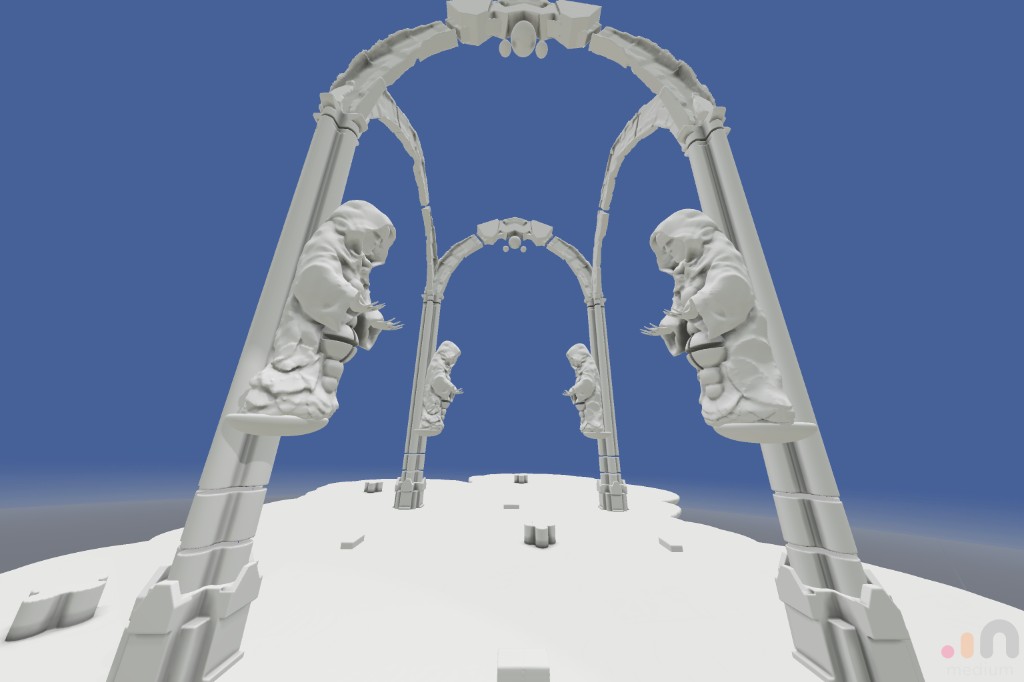
Many of the sculptural elements in these scenes begin as VR sculpts before being imported into Blender.
Spreading Visuals Over Music With Vizloom
There are two different ways these loops adapt to the music. Sometimes the initial render already contains motion or shapes that clearly mark a beat. But the more important layer of expression comes later: each animation is rendered into multiple separate layers, each containing a different light source, and those layers can then be recombined differently for different songs.
Blender already supports rendering light sources into separate passes in many cases, although for some situations I still have to use scripts to automate specific render passes, such as turning emissive materials on and off or switching between different skyboxes. However they are produced, the end result is a stack of videos that can be recomposed later. Rendering all of those layers can take several days, but that cost is what makes the later flexibility possible.
Light Sources and Additive Compositing
To understand why these layers are useful, it helps to think in terms of how light actually works. When multiple light sources affect a scene, their contributions add together. If I export those contributions separately, I can perform that addition at a later time instead of as part of the original render.
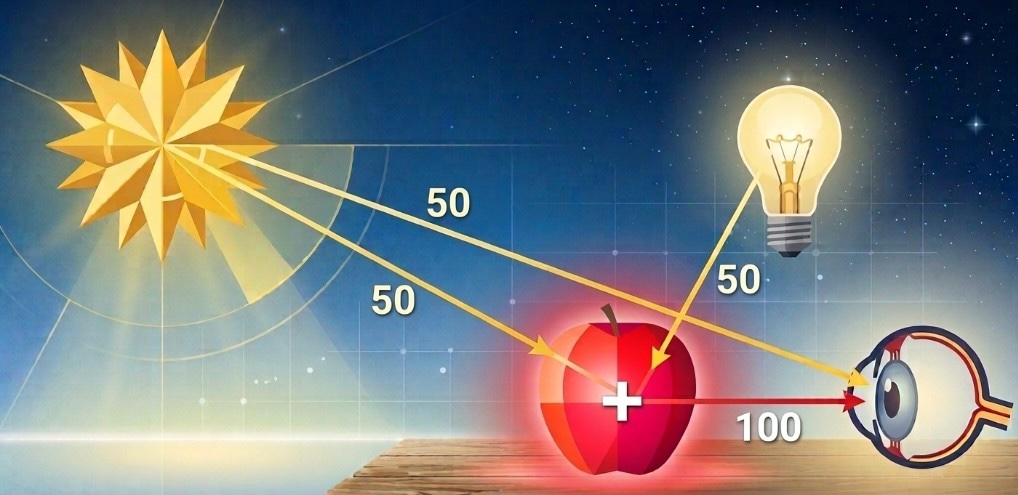
Rendering light separately means I can later recombine it with additive blending and treat opacity like intensity.
You can see the difference very clearly in any image editor. By default, layers usually use a normal blending mode, which means the top layer simply covers what is underneath it. If that top layer is mostly black, it will darken or even completely hide the image below. Lowering its opacity only mixes some of that darkness back out, but the result is still dimmer than before.
That is not how separate light sources behave in the real world. If a scene is already lit and you add an unplugged lamp to it, the scene should not become darker as a result. That is why these passes need to be combined with additive blending instead. In additive mode, black behaves like zero: it adds nothing. Brighter pixels add more light. So once the render passes are stacked additively, the opacity of each layer starts to behave like the intensity of its respective light source. The scene stops being one fixed video and becomes a set of controllable light ingredients that can be brought in, faded out, and recombined for different songs.
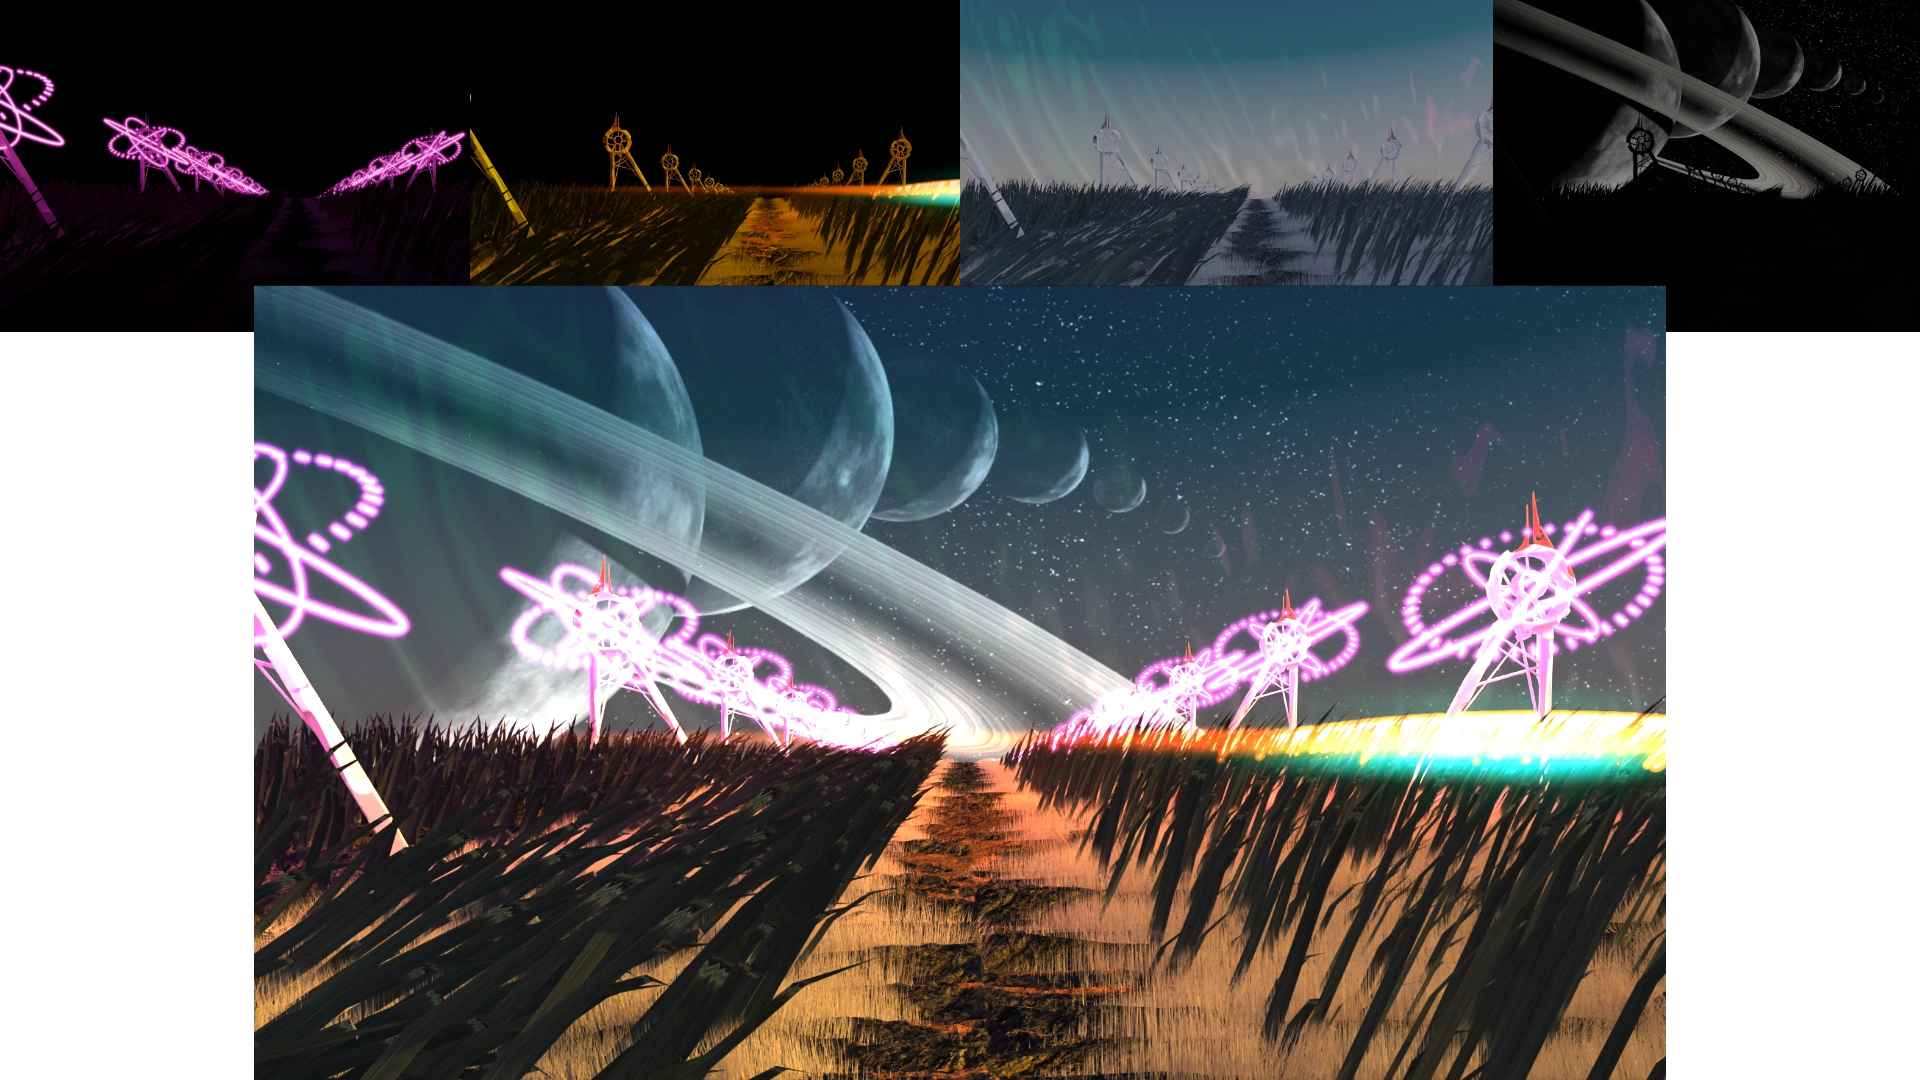
Separate passes can be layered additively to rebuild the final scene while keeping each light source independently controllable.
Sometimes I also export what I call "glares," which contain the visible shape of a light source with some glare but without all the surrounding scene geometry. Those are useful because I can then transplant them into other scenes without creating unwanted overlaps and "ghosts".
Vizloom
Vizloom is where these ingredients finally get tied to music. This specific workflow is only one way of using it, but it is also one of the reasons that inspired me to build the software in the first place.
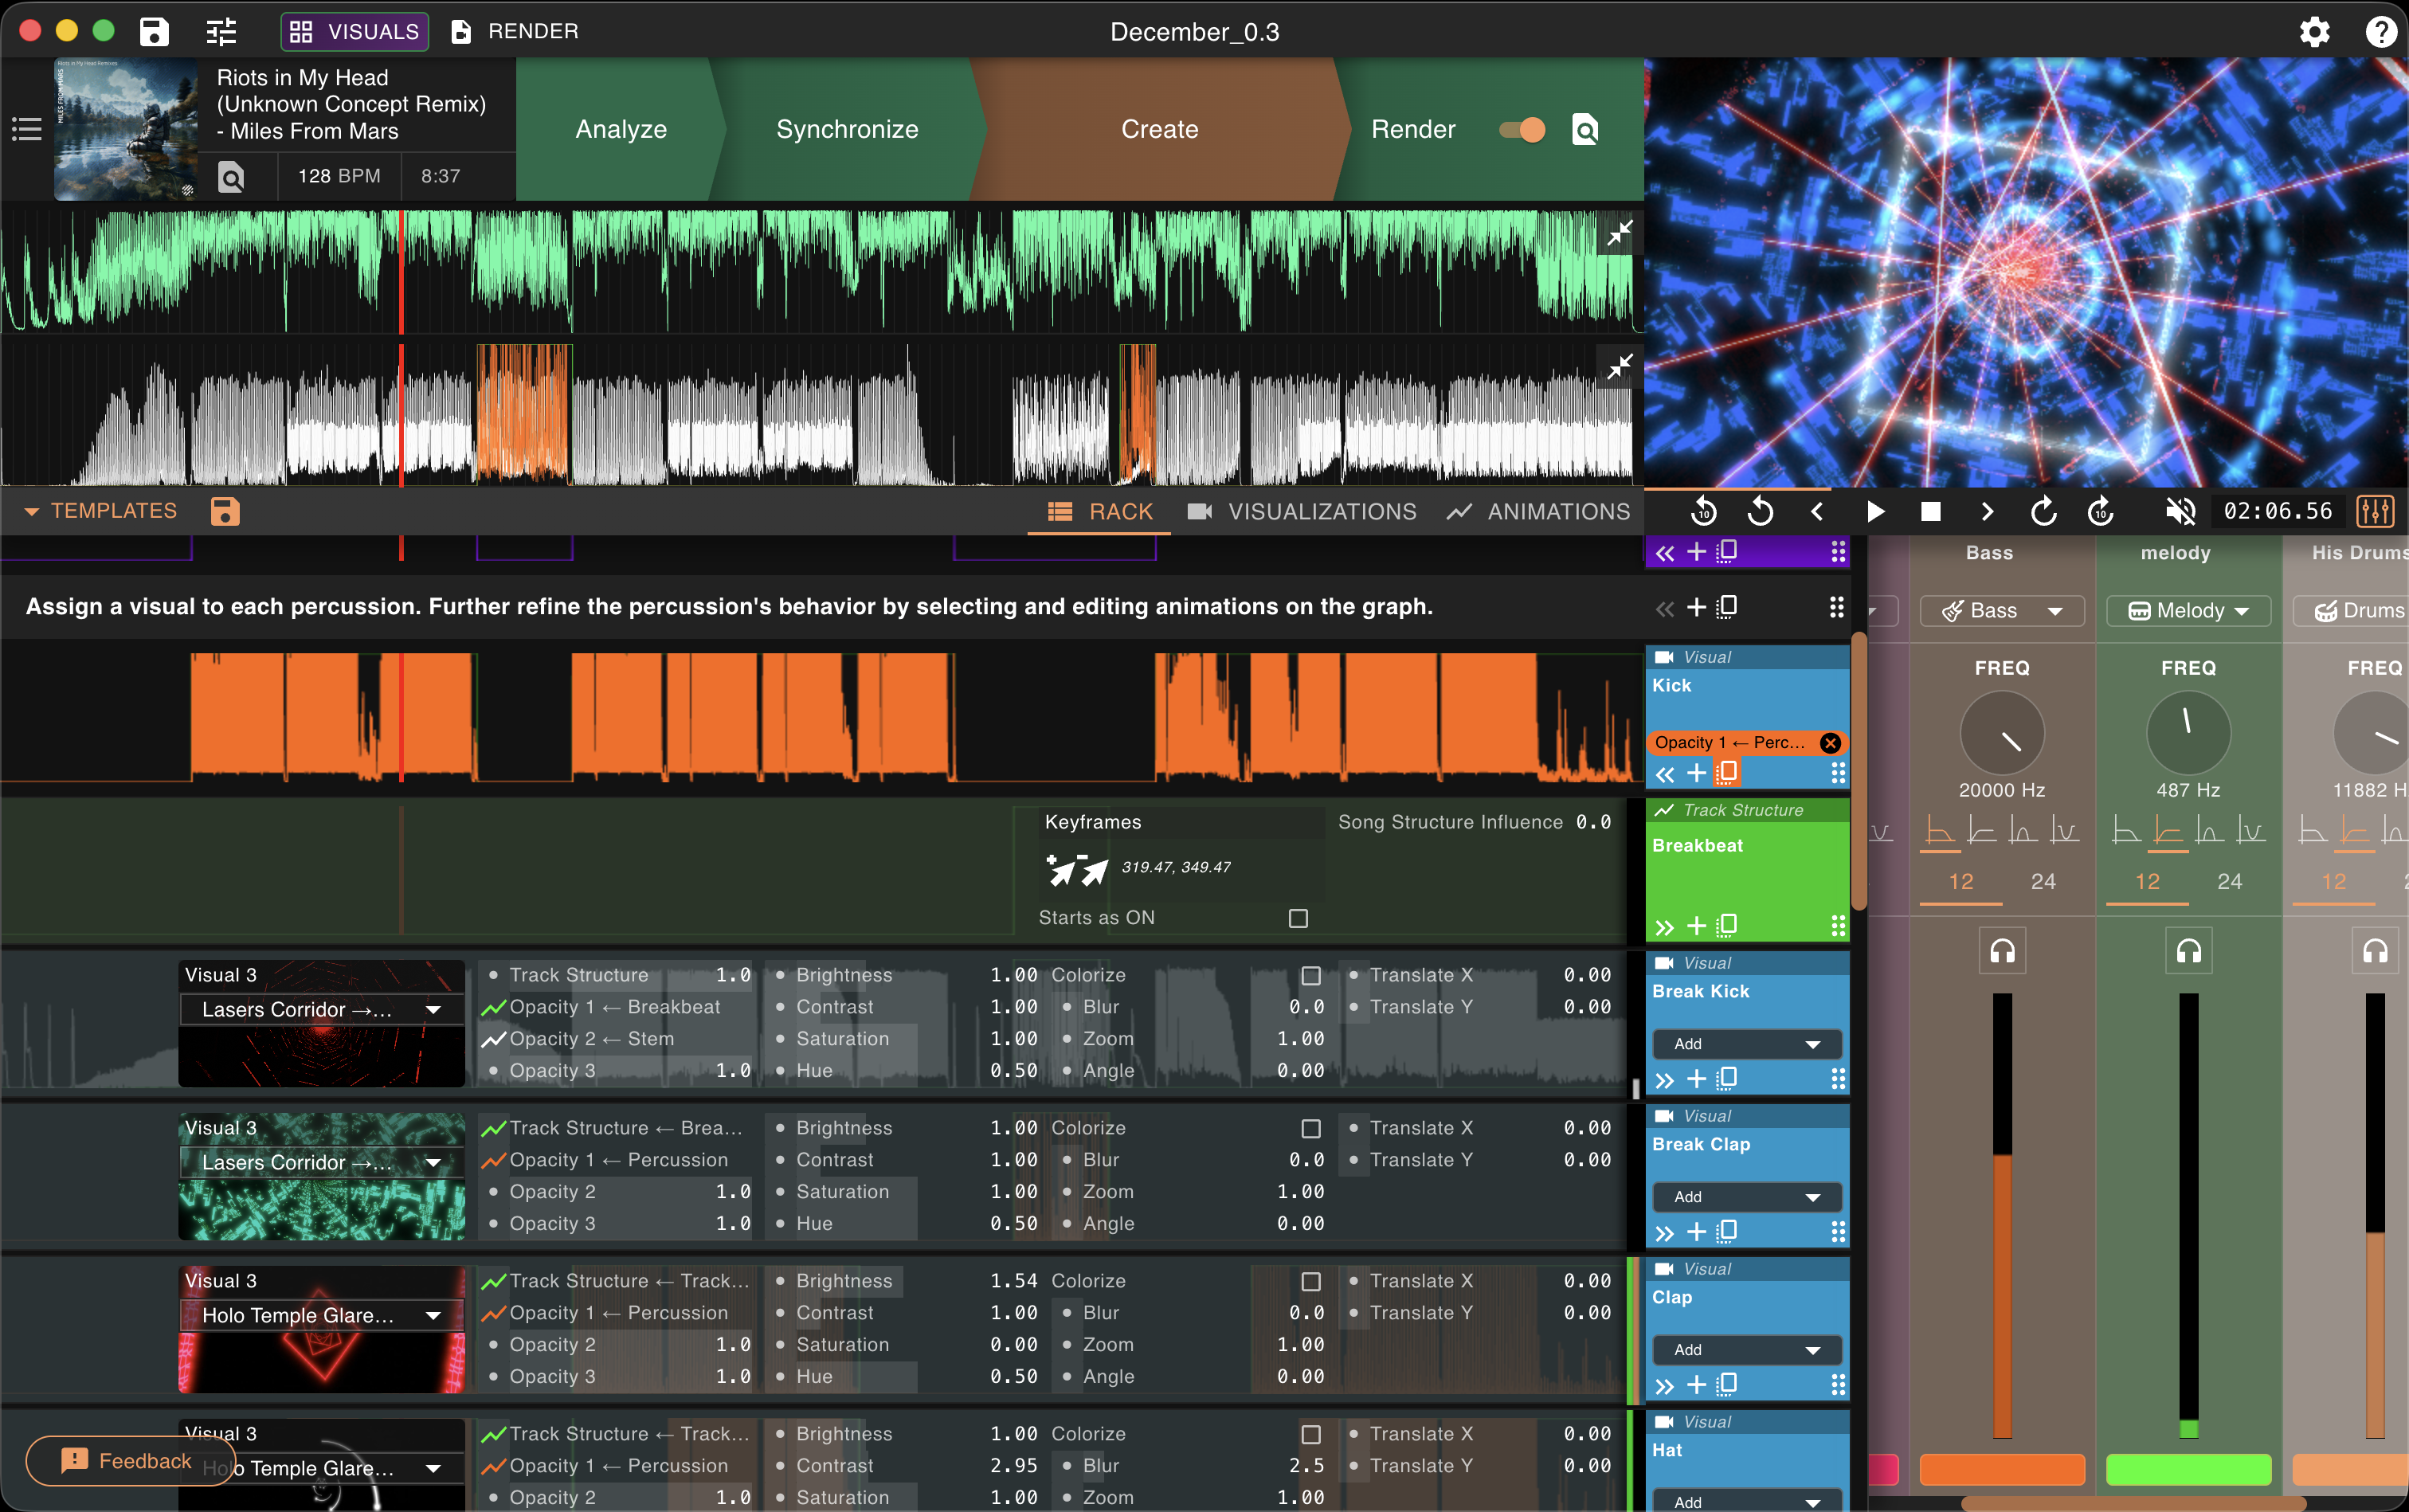
This is where the rendered light layers get assigned roles, animated, and adapted to the structure of a specific song.
My routine is usually to add a batch of new songs to my library every month or two, sort them by BPM, and then gradually work through them depending on which genres I want to explore for upcoming gigs or simply out of curiosity. On a normal day I might pick one song and spend 10 to 15 minutes making its visual. Over time that produces a library where the tracks are ready not just as audio, but as full-fledged procedural music videos. In practice, that means I can add five or six new songs to a DJ set every week while still getting properly acquainted with the rest of the library, which worked well for me.
While importing my 3D renders into Vizloom's visuals library, I organize them into folders. Each folder corresponds to one scene and contains all of its layers.
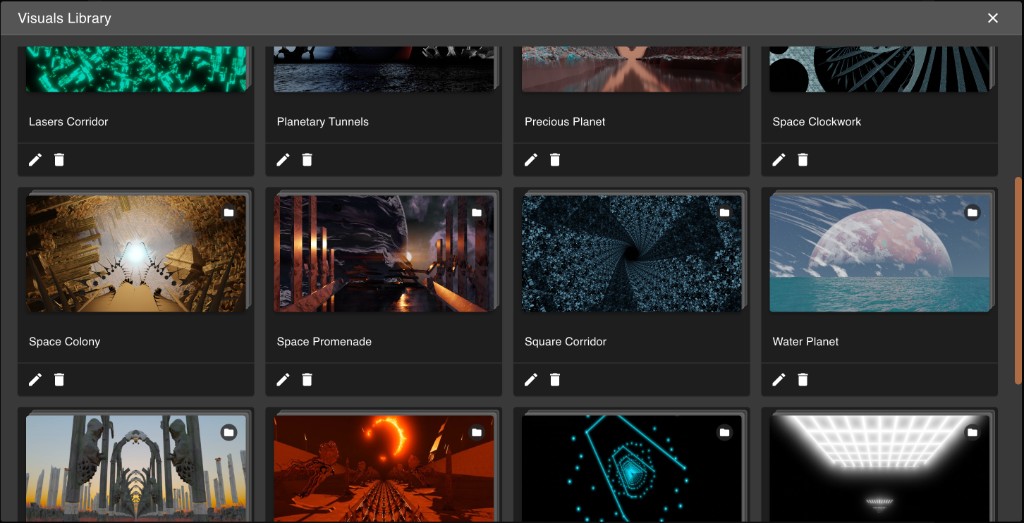
Each scene lives in the visuals library as its own folder of reusable rendered layers.
In Vizloom's creative editor, each of these layers is set to additive blending. Their opacity is then modulated partly by sound-driven behavior and partly by manual structure. One layer might correspond to the kick. More holographic elements can be used for hats, claps, or other high-frequency sounds. I also use dedicated tracks to assign similar layers to different notes of the same instrument, creating a sense of movement that expresses that correlation visually.
Many layers are assigned to slowly-evolving animations that track the broader structure of a song. For example, I will usually fade a "daylight" layer to represent a breakdown, or a "fog" layer (basically a blurred and tinted depth map) if the melody is more mysterious.
Because the layers remain independent, I can recolor them, blur some but not others, and mix elements from different scenes together. This is especially fun because there are endless combinations to explore when chasing slightly different moods or energy levels.
Video-DJing With Serato
At the final stage, all of this stops being a rendering workflow and becomes a live performance setup. The basic idea of video-DJing is simple: instead of mixing audio files, you are also mixing music videos. Most DJ software now offers some version of this, and even some VJ software, like Resolume, can automatically display the music videos of the songs being played on the decks.
My main setup uses Serato for DJing together with MixEmergency for video and a custom TouchOSC interface on a tablet for extra controls.
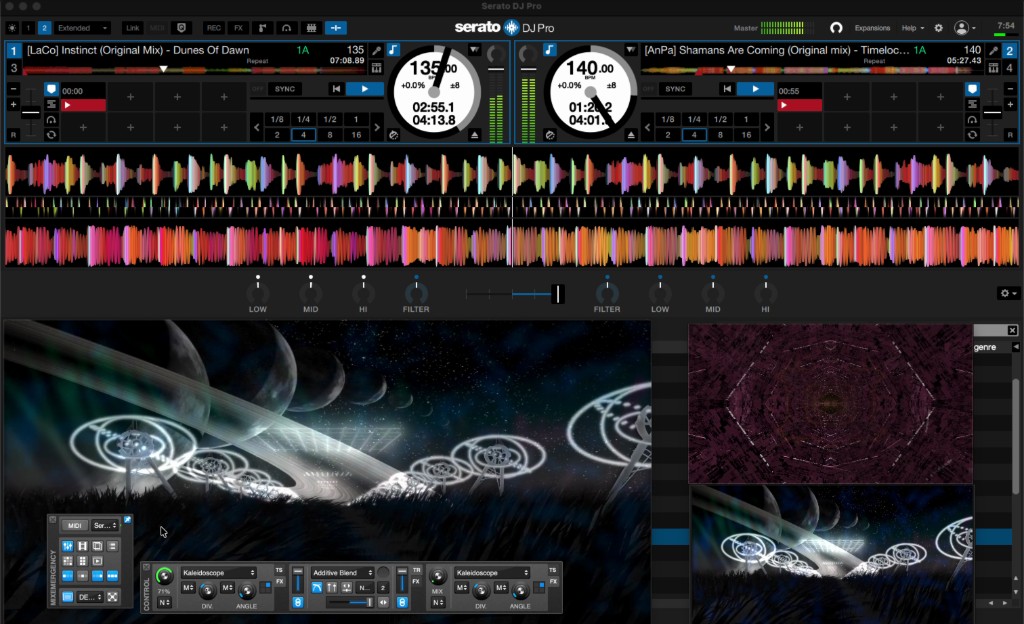
The live setup is where prepared visuals stop being individual songs and start becoming a performance instrument.
MixEmergency and TouchOSC
I like MixEmergency because it gives me much more control over visual transitions and effects than the default video features in Serato. Crucially, it lets me fade kaleidoscopic effects in and out instead of switching them on abruptly. Since the whole aesthetic is based on seamless progression, that matters a lot. I mostly use kaleidoscopes because they allow me to shape the visual from each song into shapes that can look cohesive together, while at the same time maintaining that sense of forward motion that is so important to the general aesthetic.
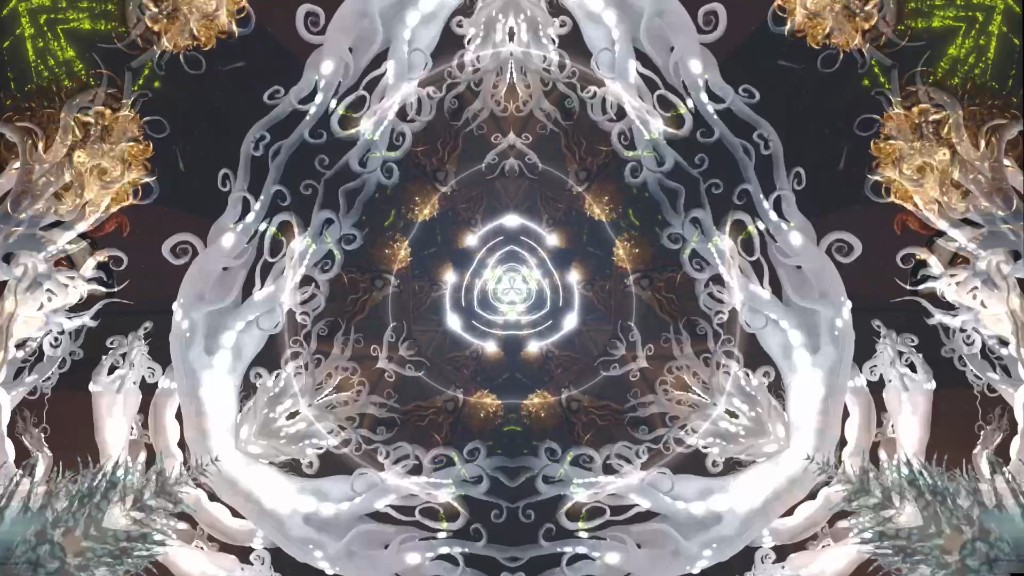
Kaleidoscopic effects let me reshape a scene into more cohesive visual patterns without losing its underlying motion.
I also use it to shape how EQ gestures affect the image. Higher frequencies can increase contrast or, when reduced, soften things with blur. Low frequencies can influence saturation in a way that makes bass swaps feel like one group of visual elements is fading out while another becomes more vivid.
To control additional video-related aspects (effects, contrast, opacity...), I built a custom TouchOSC layout. When I run it on my tablet, it emits MIDI events that can be mapped to any of the MixEmergency parameters, just like any MIDI control surface.
Finally, I use the crossfader to drive the video transition, not always at the same time as the audio. Because the visuals are loops, I can often start looping and blending the next song visually long before I begin mixing its audio.
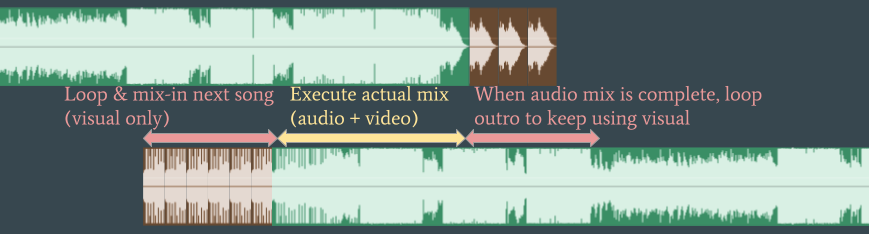
A typical trick is to start mixing in the next track visually before the audio transition actually begins.
That gives me an extra visual loop to enrich different moments of the outgoing track, helping me represent the gradual buildups that often happen in progressive styles of electronic music. Because the visuals were designed around musical roles that many tracks share, songs that mix well together often produce visuals that layer well together too. That is what leads to the well-orchestrated flashing and pulsing that can create a somewhat hypnotic effect.
Conclusions
I hope you found this deep dive interesting. And if it inspired you to build your own music visualization workflow, try out Vizloom as the glue between your visual art and your favorite music.